Tag Archives: diy

60 Days Until Halloween!

We’re finally in the -ber months, and that means it’s my favorite time of year.  September 1 marks 60 days until Halloween, so if you haven’t started planning, you better get at it.

Since this month ushers in the return of fall, and the whole month of September is basically Halloween Eve (for those of us that celebrate Halloween all October long), it’s a great time to start talking almost exclusively about the big day.  I’ll be posting my reviews of Halloween merchandise, creepy project tutorials, and other Halloween-related fun.

But don’t be surprised if I throw a movie review or two in.  There are a lot of great horror movies on the way (can you say IT?!?!?!?!?), so I know someone who will be busy at the theater.

Me. That’s who.

So check back soon for some new posts! I’m ready to start talking my favorite holiday of all time, so I hope you’re ready to read.

DIY Halloween: Skills You Need

For my last DIY Wednesday post, I gave you a list of materials you needed to gather for your Halloween projects.  Materials, however, are nothing without skills.  What skills? I thought you’d never ask.

DIY Halloween_ Skills You Need(1)

1. Making a budget

image

I know.  It’s not fun to think about (unless you like math – like me), but budget plays a big part in your Halloween DIY process.  Why make a prop if you can buy it cheaper?  My main impetus for prop-making instead of prop-buying is saving money.

Also, I’m a little vain, so compliments about my work are a big factor, too.

When I’m about to start my seasonal prop-making process, I like to sit down and write a list of a) the props I want to make, b) the materials I need to make those props, c) the approximate cost, and d) where I can buy materials for the cheapest amount.  You don’t want to just start buying a bunch of supplies that you may or may not need.  That’s just wasteful.

2. Knowing what will come in handy

image

I’m not recommending for anyone to become a hoarder, but if it’s close to Halloween, keep an eye on your garbage.  Many of the things we call trash can be very useful for a prop.  Milk jugs can be cut up to become fingernails, newspaper can be used for papier mache, paper towel/toilet paper rolls can become prop arms, etc…  The list goes on and on.

For example, we use plastic grocery bags for trash bags in our house.  I felt like we were suddenly getting covered up in them, so I almost threw them out.  I stopped myself, though, because plastic grocery bags are pretty great for filling out prop bodies.  Now, I have a small bunch of them being stored for the Halloween season.

3. Having basic hardware knowledge

image

This might seem a little elementary, but props need tools.  That’s just a fact.  Know when to use a hammer, a power drill, nails vs. screws, etc…  Watch some tutorials online.  For real.  YouTube is a valuable resource for just about anything, and that goes for prop-making, too.

4. Knowing how to use electronics, motors, etc…

image

This is more for advanced prop-makers, but who doesn’t love a moving prop.  Or even an immobile prop that lights up.  There’s just a certain oomph that electronics give to props, so don’t be scared.  Dive in. The YouTube comment from the last section goes for this, too.  There are also schematics online to help with wiring.

It doesn’t have to be that complicated.  You can use oscillating fans for moving heads.  You just have to know how to rig everything up and not blow out the motor (I learned my lesson on that one).  Or you can just start small with lights and batteries from Radio Shack.

Don’t. Be. Scared.

5. Painting

image

Painting can make or break your prop.  It’s the final step (usually), so you don’t want to screw up your prop at the very end.  It’s just as easy to make a prop look terrible with paint as it is to make it look awesome.  You don’t want to get to the end of making a severed head or gravestone out of styrofoam and screw up by using spray paint.  Your prop will be eaten, and you will be sad.

That’s the first step: know what type of paint to use.

The second is knowing how to use paint.  If you have a large prop, it’s best (in many cases) to give it a base coat of one dark color and then dry-brush on your accent color to give your prop depth and character.  If you need to use spray paint, MOVE YOUR ARM CONSTANTLY.  And use light coats.  Some props might benefit from the gloppy, drippy look, but many will not.  Just go one step at a time, and when you’re happy with the look, stop.

6. Sewing

image

I wish I could say I saved the best for last.  I wish I could say I’m an expert sewer.  I wish I could say sewing is fun.

I wish for a lot of things.

But I suck at sewing.  I hate  it.  The fact is, though, that sewing is pretty useful.  And the great thing about making Halloween props is that the sewing doesn’t necessarily have to be perfect.  You can do it by hand or use a sewing machine.  Some props might benefit from a nicely-tailored outfit, but some might benefit just as well from burlap and a chunky twine stitch.  Use whatever you need to make it look good.  No one’s going to be inspecting them too closely, so don’t freak out too much about it.

image

I could go on and on, but these are the main skills I think any good prop-maker needs.  You don’t have to start off as an expert.  Learning is a process, and there’s always a bit of trial and error with this DIY stuff.  Just keep your cool, and don’t get discouraged.  You’ll do fine.

And if not, you can always buy something.

Halloween Is Coming Soon!

We’re at less than 90 days left until the big holiday, and I see signs of it everywhere I look.  I posted this pic last week:

20160802_185110

That’s a Halloween Express that’s being set up in my town.  And yesterday, I snapped this shot:

image

Excitement! Happiness! Elation!  It’s almost time!

Another sight that makes me so happy to see is this:

20160709_135834

That’s a section of school supplies that’s been up at a local Walmart.  You know what comes after school supplies, right?  HALLOWEEN STUFF!!!

So if you’re like me, you’ve been thinking about what you need to do to get ready for the big night.  If you haven’t, you might have read the first sentence of this post and thought, “HOLY CRAP! LESS THAN 90 DAYS!  I DON’T HAVE MUCH TIME!”

You’re right.

And to help everyone who reads this blog, my Halloween season schedule will be a little different.  You can expect the following posts in the next few months:

  • Merchandise Reviews: I plan on reviewing which stores have the best Halloween items and how they rate on originality, costume selection, quality, and price.  I’ll also do store comparisons (i.e., specialty store vs specialty store, etc…).
  • Decorating on a Budget: What is your budget?  10? 20? 50?  I’ll give ideas for various budgets to show anyone can decorate for the big day.
  • Halloween Food Specials: Stores and restaurants always have fun holiday items, and I’ll make sure to point out any I find.
  • TV Specials:  Are you curious about when “The Great Pumpkin” will air or if your favorite show will have a Halloween episode?  I’ll be your guide.
  • Haunted House Reviews: These will probably only be beneficial to local peeps, but I’ll be going to local haunted houses and reviewing them here.

Those are just some of the topics I’ll cover.  I hope that I can help at least a few people with their Halloween.  If you have any other ideas for blog posts or if you have specific questions, just let me know in the comments!

DIY Halloween: Materials You Need

It’s August, and since Halloween is less than 100 days away, it’s time to start your projects.  You might think, “It’s only August.  I have PLENTY of time.”

You’re wrong.

Just check out this picture I took today:

20160802_185110

Yep.  That’s the beginnings of a Halloween store. Halloween Express to be exact.  They’re getting ready for the holiday, and so should you.

If you’re new to the DIY Halloween thang, you might be wondering where to start.  Well, look no further for I have been sent here to enlighten your minds!  Or at least I’m prepared to help get you started.  First things first, we’re talking materials.

DIY Halloween_ Materials You Need(1)

PVC Pipe

I wrote a whole post about this stuff, so you should check it out here.  From monsters to cages to mausoleums, this stuff can be the base for anything.  Adult tinker toys, ladies and gentlemen.  That’s what they are.  Buy some pipe and fittings today at Lowe’s or Home Depot.  And don’t forget your pipe cutter!

Papier Mache

Newspaper and the glue mixture of your choice is all you need to make a crazy awesome prop.  I used some to make a cool scarecrow head one year (read here), and I also made a witch head for a prop last year, which I’ve yet to discuss on the blog.  That’ll come later.

Monster Mud

This stuff is like heavy duty Papier mache used for bigger projects.  To make this stuff, all you need are drywall joint compound (found at any hardware store) and any latex paint you have lying around.  Color doesn’t matter because this stuff is fully paintable after it dries.  Mix it with a drill and paint-stirrer attachment in a large bucket.  After that you can dip fabric in the stuff to cover your props or just paint on the mud itself to create an outer shell.  There are a ton of tutorials online.  Just check out Google or Pinterest for some ideas.

Wire

You can use different gauges of wire to do different things.  I like to use a lighter gauge wire to hang props and heavier gauges to make moldable fingers, spiders, etc…

Foam Heads

These can be found at most craft stores, and they can be used for – well – prop heads.  I made a severed head out of one, which you can read about here.  They can also be used to finish off a full-size prop or even hung with cheesecloth to make a ghost.  Oh, that reminds me…

Cheesecloth

Cheesecloth is pretty versatile.  You can use it to make ghosts and shrouds, you can drape it over mantels or tables for a creepy effect, or you can pair it with monster mud to create detail or make clothing for your props.

Old Clothes

What?  You want your props to be naked?  Well, that’s your decision to make, but for those of us who want props suitable for the eyes of tiny trick-or-treaters, clothing is kinda essential.  Go to garage sales or just raid your closet for old items you don’t want anymore.  The fun part is aging them.  Bury your prop clothes, rip them, paint them, run them over with your car – anything to make them look nice and old.

Paint

This one is a no-brainer.  You want to make some props, you gotta paint them or it’s just going to look unfinished.  I use spray paint for larger projects and latex/craft paint for smaller crafts and detail work.

Scrap Wood

I think everyone who has a house probably has a few pieces lying around.  I haven’t really used wood to create a large prop, but I’ve nailed pieces together to make a sturdier base for some.

Foam

I don’t have much experience using foam in my crafts, but I’m going to remedy that this year.  You can buy large sheets of foam at home improvement stores, and I’ll be buying some soon to create a life-size coffin.  Foam can also be used to make tombstones.  I’ve got a foam cooler that I plan on fashioning into one in a few weeks.  It’ll be my first foam-based project, so I hope it turns out okay.

image

Well, that list should give you a good start to your DIY Halloween projects.  So gather your materials, folks, and get to crafting.  You don’t have much time.

How to Make an Easy DIY Window Monster

Halloween is creeping toward us, and I am FUH-REAKING out because I haven’t started on my projects yet.  Yes, I have 102 days left as of the date of this post, but I have A LOT planned this year.

I’ll be posting more-involved DIY projects throughout the Halloween season, but since we have a little over 100 days until the big day, I thought I’d just post a quick little project I whipped up a few Halloweens back.

Three Septembers ago (a Friday the 13th actually), we moved from an apartment into a small house.  Moving is a lot of work, so I didn’t have a lot of time to prepare for Halloween that year.  I set out my cemetery and hung up some ghosts and goblins.  I really wanted to do more, but I just didn’t have a lot of time (or money – buying a house is expensive).  I was proud of my little cemetery, but I thought my house was missing something.

We have a big double window by our front door, so I decided to dress it up a bit.  BUT…I didn’t want to spend any money.  Luckily for me, I’ve got a creative mind.  I had some black, easy-peel contact paper – the kind that doesn’t stick too much.  I cut out some eyes and teeth, stuck them to the window, and – VOILA! – window monster.

image

Ain’t it fun?  It took hardly any time at all, but it added a bunch of Halloween flava.  Kids loved it, and with it backlit from behind with a low lamp, it showed up great.

What kinds of fun projects do you foresee for your Halloween festivities?  You better start planning now!  I know I am.

DIY Dollhouse of Horrors: Part 2

Well, it’s another DIY Wednesday, and I’m sure you were waiting on pins and needles for the next installment of…

THE DOLLHOUSE OF HORRORS!!!

I wrote about why I decided to make a haunted dollhouse and the planning stage in the previous DIY Wednesday blog post, so if you haven’t read that yet, go here.  

After the planning stage, the only thing left to do was buy the actual dollhouse kit.  I waited for a 40% off Hobby Lobby coupon (believe it or not, they didn’t always come every week back in 2009) and off I went to my favorite craft store where I bought this:

image

I won’t lie.  I was really excited to get this thing, but when I opened the box and saw all the little parts, I was a bit overwhelmed.  If you decide to build your own dollhouse, don’t fret.  Just follow the instructions, and you’ll be fine.

Even though I got a case of the ‘Uh Ohs’ after I saw the contents, I still couldn’t wait to get started.  I like to be completely prepared before I start a project, so I made sure I had all the necessary materials for construction before I jumped in, including:

  • Wood glue,
  • Painter’s tape,
  • A craft knife,
  • Sand paper,
  • A ruler,
  • Measuring tape, and
  • A pencil.

Then, the fun began.

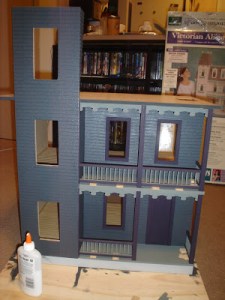
image

Sadly, I don’t have many pictures of the actual construction process, but you can see from the pic above that there was a lot of gluing and drying time involved.  It wasn’t too hard to do after I got started; it just took a lot of time and patience.   It was just like a big puzzle. So. Much. Fun.

image

image

There were also a lot of little parts that were easier to paint before I glued them to the house.  I went with a dark purple and gray color scheme because I wanted it to be really dark, but I didn’t want it to be black.  Plus, purple is one of the primary Halloween colors.  It just felt right, you know?

Here’s a pic of the painted house waiting for a roof:

image

And here’s a pic during roof construction:

image

And then another of the house with the roof completely on:

image

And…drumroll please…here’s the finished house!

image

Well, almost finished.  And you can see the plywood “yard” I put the house on.  I ended up gluing the base of the house to the wood so it would be a little sturdier.

I enjoyed building the house, but my favorite part was decorating it!  That part is still in progress, so be sure to check back on the next DIY Wednesday for another installment of…

THE DOLLHOUSE OF HORRORS!!!

How to Create Awesome Halloween Props with PVC Pipe

PVC pipe.  If you haven’t played around with this stuff, you’re missing out on some fun.  It is so versatile.  Just type PVC Pipe in Pinterest and feast your eyes on all the cool things you can do. You can find everything from garden watering systems to a homemade ball pit for kids to organizational projects for the home. And of course, you can use them for Halloween props!

I never knew how much I loved PVC pipe projects until I saw a picture of a zombie prop frame and decided to try my hand at it.  I got my project list, headed to Lowe’s, and ended up with this just a little while later:

20141021_214215

You’ll have to forgive the low-light pic, but just look at this cool thing.  It was my first prop project, but it definitely wasn’t the last.  Check out these fun monsters I also made with a PVC pipe base, some masks, clothes, and foam heads:

If you want to try some projects out for yourself (and I know you do), just go to your local Lowe’s or Home Depot and check out their selection.  The pipe itself comes in multiple sizes, and there are fittings of different angles to make your wildest dreams come true!

Okay. Maybe not your wildest dreams, but you’ll be able to do some pretty cool stuff with it.  They’re like adult tinker toys.  Seriously.  It’s so fun.

Here are a few tips and tricks to get you started:

Draw it out.

The only art skill you need for this is basic stick-figure drawing.  Drawing your prop first and counting the angles and connection points helps greatly with knowing how many fittings of each type you need.

For example, this is my sketch for the large standing prop:

An artist I am not. But you really don’t have to be. Draw the basic shape of your prop. For this one, I just wanted him to be standing straight with a slight bend to his arms, so it was very simple. For props that need strange angles, just draw them to the best of your ability. These are the guides I used for my monster props in the pics above.

See? More complicated but not impossible.

Use yourself as a guide to determine how long you need each section to be and write that down. Add all lengths together, and that will tell you how much PVC pipe to purchase.

To easily determine the type and number of fittings you need, use a different color pen and circle where pieces of pipe connect. The basic types of fittings available are 90-degree elbow, 45-degree elbow, 3-way elbow, tee, and cross. There are other types in stores, but these are the basic ones you will most likely use. After you’re finished, count all the circles for each connection. Now, you know how many of each type of fitting to buy.

BUY A PVC PIPE CUTTER.

There’s a reason this one is in all caps. A PVC pipe cutter makes these projects go so much more smoothly and cleanly than using anything else. I tried using a hacksaw the first time followed by an extra small rotary saw blade.  It sucked.  PVC dust went everywhere, and that’s just not healthy. You can buy one of these cutters at Lowe’s or Home Depot for cheap, and it makes all the difference. Other tutorials recommend the hacksaw, but I’m super partial to the pipe cutter method.

Make it sturdy.

PVC pipe fits pretty snuggly by itself in the fittings, but over time, the pipe can loosen, which can cause your prop to fall or possibly break apart. If you want to make your props permanent, use PVC glue found at any hardware store.  Or you can use them on select fittings to keep your props a little more stable but still able to be deconstructed easily.  

I don’t use the glue much because I like to be able to take my props apart completely.  When you have as much Halloween stuff as I do, space is a big deal. So I use screws. Small wood screws inserted into joints can make all the difference, but you’ll still be able to break down your prop for storage.

Be creative with other materials.

Use your imagination to make your props bigger and better by combining these projects with other prop-making materials.  

  • Create a full base for a large-scale prop by wrapping chicken wire around a PVC pipe base and adding papier mache.
  • Add thickness and depth to your props by using chicken wire or cardboard under clothes/costumes.
  • Foam pool noodles can be used to flesh out arms and legs.
  • Use spray paint directly on the pipe to make cages or “steel” pipes in your Halloween display.  There are just so many options.  
  • Combine different sizes of PVC pipe with wire and cardboard to make other body parts. For instance, with some thick-gauged wire, cardboard cut in the shape of my palm, and masking tape, I made these creepy, skeletal hands and arms.

So get out there and try some fun projects of your own.  There’s no wrong way to do it.  Unless you don’t use a PVC pipe cutter.  That’s just dumb.

Let me know your successes with PVC pipe in the comments! And be sure to check out my other DIY tutorials, including:

How to Corpse a Skeleton

How to Make a Flying Reaper

How to Create a DIY Giant Spiderweb

5 Ways to Use a Dollar Tree Skull

Make It Work

I love Halloween, but that does not mean I have an all-inclusive attitude toward Halloween things.  I have drawn a definitive line at the cutesy stuff.  Halloween is meant to be scary or, at the very least, dark and mysterious.  I don’t want to look at Halloween things and think “Awww! How adorable!”

Unless you’re talking about little trick-or-treaters.  I had at least 3 Elsas come to my door last year, and I thought they were precious.

Anyway, I say this to tell you that my prejudice against the cute almost made me miss out on a pretty sweet deal.  A few years ago, my husband and I were at Lowe’s two days before Halloween, and they were clearancing out their merch to make way for Christmas stuff.  I only glanced at their dwindling selection.  One of the clearanced items was an adorable (read: nauseatingly cute) life-sized, animated witch, complete with pastel pink striped socks, cute little boots, and pink ribbon in her bodice and hat.  She was also wearing a brightly-colored tutu.

20141030_162018

That’s right.  A tutu.

Needless to say, this didn’t sit well with me, and I began to move along, but my husband stopped me.  Like me, my husband can’t pass up a good deal, so he’s always on the lookout for a sale. He noticed a sign that said clearance items were an additional 75% off their already 50% marked down price.  That meant that this cutesy, originally $150 witch was now $20.

*Record Scratch*

Halloween prop-making was still new to me, so my first thought hadn’t been how to make this work.  Those thoughts were just, “Ew. Cute. No.” But after finding out about the crazy low price, I started thinking about how I could improve it.  I mean, $20 for a life-sized prop is a freakin’ amazing deal, and I couldn’t pass it up.  I knew I had craft paint to up the creep factor and a few black capes I could use to cover the skirt at home.  So $20 and some change later, we were loading that baby up in my car.

And this is what she looks like now.

20141030_213607

Pretty sweet, right?  She’s been greeting trick-or-treaters at my front door for the past two years, and now I never turn down something at first site.

2015103195183720

How to Make a SEvered Head: An Easy-to-Follow Guide

I love severed heads.  Not real ones, of course.  I love the fake kind, and I experience quite the thrill when I finally get to check out the selection at Spirit Halloween and Halloween Express each year.  I usually buy one myself, and then my mother-in-law gets me one for Christmas.  It’s a tradition that I’m pretty fond of and one that makes my MIL one of the best in history.  Does your mother-in-law get you  severed heads for Christmas?  I didn’t think so.

Anyway, I love getting a “commercial” creepy head, but there’s a certain charm in the homemade stuff.  A few years ago, we moved from an apartment to our house, and with the added space came a new-found love of making props.  So even though I already had a pretty decent head collection at that time, I thought I’d try my hand at making one myself.

This is how I made my very first DIY severed head Halloween prop.

Materials

  • Foam Head (any size you prefer)
  • Craft Knife and/or Metal Carving Tools
  • Prop Teeth
  • Hot Glue Sticks & Glue Gun
  • Assorted Paints (blood-colored + any other colors you need to create your vision)
  • Plastic Eyes (optional)
  • Twine/Thick String (optional for hanging heads)
  • Ice Pick/Long Screw Driver/Thick-Gauge Wire (optional for hanging heads)

Step 1

I started by purchasing a foam head from Hobby Lobby that using one of their 40% off coupons.  (Aside from being a horror fan, I’m also a big proponent of getting the best deal, so I try to buy as many of my supplies on sale or clearance as possible.)

 Hobby Lobby has a few varieties of heads to choose from – female, male, and faceless – so you can choose whichever fits your project best.  Although the faceless ones are creepy on their own, I wanted mine to be pretty big, so I went with a male head.

20140905_181053

Step 2

As you can see from the pic above, my next step was to draw out the features I wanted for my severed head.  I wanted it to be gross, and keeping both eyes just wasn’t an option.

Step 3

I used a craft knife and some metal sculpting tools to pick and carve out where I drew my guidelines: one of the eyes, part of the scalp, and the base of the head to make it look actually severed.  I recommend roughing up the base of the head for any head you create. We want realism wherever possible, people, and a clean-cut head just won’t – well – cut it. (I’m sorry. I hate myself).

Step 4

To give him a more realistic-looking mouth, I also carved out some of the area around the side of the mouth and jaw and used some fake zombie teeth that I bought at Spirit Halloween.  The teeth were rubber and very easy to cut.  They were also ridged on the back to make them easy to wear, so I sliced off the back to make them lay flat as possible to fit the head.  I then used a hot glue gun to secure them in place.  You can see in the pic below that my guy was already looking pretty handsome at this stage.

20141030_222610

Optional Step (not pictured)

If you want to add eyes to your severed head instead of painting them on, there are many options for plastic fake eyes to find in your local Halloween stores. I recommend finding the hollow plastic versions that are easier to cut for this project.

Cut the eye in half with a craft knife and hold to your foam head in the position you want it. Trace the outline of the eye, and use your craft knife to cut straight into your foam in the approximate depth of your eye. Test the depth of your cuts with the eye before adhering to the head. When you’re satisfied, add glue to the inside of the eye, an then stick the eye edges down into your cut foam.

Tip: You could also use yarn, twine, wire, or something similar to stick to your head and eye if you want to go for that “just-popped-out-eye” look.

Step 5

After the glue dried, it was time to make it PRETTY!!!  Pretty to me, at least.  I already had a lot of paint on hand so I mixed some random colors together to get a sickly, partially-decomposed skin color.  Like I said – pretty.  I also mixed some red, black, and brown to get a realistic bloody color.  I slapped my paint mixtures on until I got the look I wanted and – VOILA! – severed head!

You have a lot of options at this stage. It really depends on the look you’re going for. Be creative!

20141030_235533

Isn’t he beautiful?

My zombie head has served me quite well these past few Halloweens.  Another benefit from these foam heads is that they already have a hole in the base, perfect for sticking them on pvc pipe or dowel rods to make a full-body prop, a head-on-a-stake, or something else equally cool.  I turned my severed head into full-body prop the first year.  (See the tutorial here.) You can see by the sweet flannel shirt in the pic above that he was quite stylish.

If you want a great creepy project, I recommend you try making yourself a severed head of your own.  It’s a cheap and easy way to up the scare factor in your home for Halloween. Plus you get the sense of accomplishment you feel when you make something with your own hands.

If Halloween isn’t your thing, it could be especially therapeutic if you make one to look like an enemy.  No judgment.  We’ve all been there.

You do you, man.