Tag Archives: Haunted house

DIY Dollhouse of Horrors: Part 2

Well, it’s another DIY Wednesday, and I’m sure you were waiting on pins and needles for the next installment of…

THE DOLLHOUSE OF HORRORS!!!

I wrote about why I decided to make a haunted dollhouse and the planning stage in the previous DIY Wednesday blog post, so if you haven’t read that yet, go here.  

After the planning stage, the only thing left to do was buy the actual dollhouse kit.  I waited for a 40% off Hobby Lobby coupon (believe it or not, they didn’t always come every week back in 2009) and off I went to my favorite craft store where I bought this:

image

I won’t lie.  I was really excited to get this thing, but when I opened the box and saw all the little parts, I was a bit overwhelmed.  If you decide to build your own dollhouse, don’t fret.  Just follow the instructions, and you’ll be fine.

Even though I got a case of the ‘Uh Ohs’ after I saw the contents, I still couldn’t wait to get started.  I like to be completely prepared before I start a project, so I made sure I had all the necessary materials for construction before I jumped in, including:

  • Wood glue,
  • Painter’s tape,
  • A craft knife,
  • Sand paper,
  • A ruler,
  • Measuring tape, and
  • A pencil.

Then, the fun began.

image

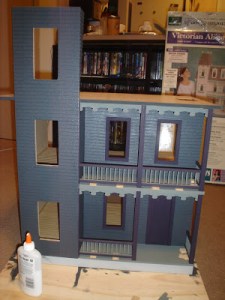
Sadly, I don’t have many pictures of the actual construction process, but you can see from the pic above that there was a lot of gluing and drying time involved.  It wasn’t too hard to do after I got started; it just took a lot of time and patience.   It was just like a big puzzle. So. Much. Fun.

image

image

There were also a lot of little parts that were easier to paint before I glued them to the house.  I went with a dark purple and gray color scheme because I wanted it to be really dark, but I didn’t want it to be black.  Plus, purple is one of the primary Halloween colors.  It just felt right, you know?

Here’s a pic of the painted house waiting for a roof:

image

And here’s a pic during roof construction:

image

And then another of the house with the roof completely on:

image

And…drumroll please…here’s the finished house!

image

Well, almost finished.  And you can see the plywood “yard” I put the house on.  I ended up gluing the base of the house to the wood so it would be a little sturdier.

I enjoyed building the house, but my favorite part was decorating it!  That part is still in progress, so be sure to check back on the next DIY Wednesday for another installment of…

THE DOLLHOUSE OF HORRORS!!!

DIY Dollhouse of Horrors: Part 1

I have a confession: I love miniatures.  I always have.  My nana had a cool dollhouse at her place when I was a little kid, and that’s where my love of little things started.  Sadly, when she moved from her house to an apartment, the dollhouse was moved, suffered water damage, and had to go.

Cue the Sarah McLachlan music and sad puppy eyes.

image

But I rallied.  I coped.  I turned to Polly Pockets for comfort and never looked back.  Except I did.  I was lying in bed one night – as a full-grown adult, I might add – and for some reason, thoughts of my old dollhouse popped in my head. I thought to myself, “I really miss all the mini things. It sucks that my dollhouse was ruined.”  Then, I asked myself, “Who says I can’t have one now?”

Not a damn soul.

I really didn’t care that I was 25 and wanted a dollhouse. You don’t have to be a kid to have toys.  Growing up is for suckers, anyway.

Since you’re reading this blog, you probably know my dollhouse didn’t turn out all cutesy with gingham curtains, floral-patterned wallpaper, and antique furniture.  A haunted dollhouse was what I wanted – one with ghosts, blood, pumpkins, madNESS, MAYHEM, HUMAN SACRIFICE, DOGS AND CATS LIVING TOGETHER! MASS HYSTERIA!

What can I say?  I was excited.

My haunted dollhouse journey began with a plan.  I found the kit I wanted from Hobby Lobby (where else?).

imageimage

Ain’t it pretty?  I liked that this one had three stories and an extra attic because what’s scarier than an attic?

Yeah, a basement.  I know.  Don’t be a smartass.

Anyway, I was bored one Sunday and wanted to create a plan of action, so I converted the pictures to coloring book format and had a little forgotten fun with my markers and crayons.  These pics aren’t in color, but I didn’t have access to a color scanner at the time, so just use your imagination.

imageimage
I planned on putting the whole thing on plywood because a cemetery seemed like a necessity.  The inside was a little harder to plan out on paper because I knew it was going to be more of a make-it-up-as-I-go thing.  The planning stage was a lot of fun but not as much as actually building the house.  But we’ll go into that next time.

Tune in on the next DIY Wednesday for the next installment of “The Tale of the Haunted Dollhouse.”  You’ll be glad you did.