Category Archives: DIY Horror

Pulsing Hearts & Bloody Arrows: Scary Valentine’s Day

Even if you don’t celebrate it, I’m sure you have an opinion about Valentine’s Day.  Love it or hate it (or just plain don’t care), if you have to do any kind of shopping, you just can’t avoid all those pink and red hearts, cupid cutouts, and chocolate, chocolate everywhere.

I fall in the category of “Hey, at least it breaks up the first quarter of the year with an event.”  I use to be one of those people that just thought it was made up and stupid, but I grew out of that because hating stuff for no good reason is just dumb.

Anyway, it’s a cutesy holiday, and while I have no problem being nice to my husband, cute just ain’t for me.  Romance movies? Blah.  No, thank you.

So what kind of creepy fun can you have for Valentine’s Day?  Well, of course, there are movies, and we can’t really talk about Valentine’s Day without mentioning THE scary movie of the holiday: My Bloody Valentine.

I own both the 1981 original and the 2009 remake starring none other than the elder Winchester, Jensen Ackles.

They’re both okay.

The original was creepy when I was a kid, and I really enjoyed the (SPOILER) twist at the end.   The remake was also fun, but it was also a little cheesy – probably because it’s made for 3D, and I didn’t watch it that way.  Lots of crazy stuff flying at the screens, which is cool, but it loses a little something in 2D.

If you haven’t seen either of them and want to hear the legend of Harry Warden, you should totally watch them now.  They aren’t the best horror movies, but they’re also not the worse.

And I will say, they’re much better than another Valentine’s Day horror movie I feel like I should mention: Valentine starring Denise Richards, David Boreanaz, and Katherine Heigl.  Very meh.

Aside from movies, you have a few other options.  Valentine’s Day cards can be made creepy with a few tweaks.  I made one a few years ago for my husband (I’ll post a pic if I can find it) that had Frankenstein’s monster and the Bride on the front with the words “Made for Each Other.”  Just because it’s not Halloween doesn’t mean you have to phone it in.

You can give your Valentine some cool flowers, like this black rose:

vA

Also, a bloody steak seems appropriate for the day.  And chocolate. Don’t forget about the chocolate.  That’s non-negotiable (unless you’re allergic and then you get a pass).

I hope everyone has a very Happy Valentine’s Day!

5 Ways to Use a Dollar Tree Skull

It’s no secret that I love Dollar Tree, and one of the reasons I love it so, so much for my Halloween shopping is that you can make so many of their items look more expensive with only a little bit of work.

Of all the Halloween items they carry, their skulls are my favorite.  I always pick up a few each year.  This year, just to help you out, I bought a few more than usual to play around with.  But with them being just a dollar, it was totally worth it.

Processed with Snapseed.
Processed with Snapseed 

1. Use metallic spray paint to make your skulls look at home in any chic Halloween setup.

Processed with Snapseed.

2. Who doesn’t love a sugar skull?  Spray paint a skull white and go to town with multicolored sharpies, paint pens, stickers, and jewels.  It’ll look great at any Day of the Dead celebration.

image

3. Transform a skull into a mini jack-o-lantern by carving it with a craft knife.   Insert a flameless tea light and – voila! – glowing skull!  You can even spray paint it orange for a faux skull pumpkin or other colors to match your decor.

Processed with Snapseed.

4. Make your skull look gross and creepy – and much more like a high-end prop – by using the corpsing technique I outlined here.

Processed with Snapseed.

5. Grab a few items you probably already have on hand and make this cool hanging ghost.  Read the tutorial here.

Processed with Snapseed.

SO. MUCH. FUN.  I hope you try out a few of these projects because you’ll be missing out if you don’t.  Let me know how your projects work out in the comments. Happy Haunting!

Reaper Madness: How to Make an Easy Floating Ghost

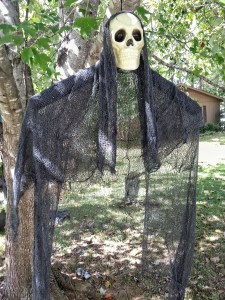
Nothing dresses up a yard at Halloween time more than a floating ghost.  Stores carry these guys plus floating zombies, monsters, and clowns, but they can get pretty pricey for some reason.  Luckily for you, these are crazy easy to make.  Please follow along, class.

First, as with all projects, you need to gather your materials.

Processed with Snapseed.

For your floating ghost, you will need the following:

  • A plastic skull
  • Creepy cloth
  • String
  • A wire hanger
  • Foam pipe cover
  • Pliers
  • Box cutter (not pictured)
  • Outdoor duct tape (not pictured)

You can buy a skull and creepy cloth from Dollar Tree, so this project is not only easy; it’s insanely cheap.  The foam pipe cover is pretty inexpensive, too.  You can get a package at any hardware store for a couple of bucks.  They actually sell white foam cover, too, but for this project I went with the dark gray.

After you’ve gathered your items, it’s time to start the assembly.

First, you need to make holes in the top and bottom of your skull.  Cut a small hole in the top and one that’s a little larger in the bottom.  You won’t be able to see them when you’re finished, so don’t worry about being exactly even.

image
image

Next up, it’s time to make the shoulders (yes, your ghost will have shoulders) and attach it to the head.   My wire hanger was one with the cardboard middles, so I’d recommend using the same kind.  If you only have a full wire hanger, you’ll need to untwist the hanger and shape it so you have a hook in the middle or just use a wire cutter to cut the middle of the bottom hanger bar.

Straighten out the sides of your hanger to make the shoulders of your ghost.

Add the foam pipe to the shoulders on each side and secure in the middle with duct tape.  Use outdoor duct tape for the best results.  That stuff works miracles.

image

Tie your string together to make a circle, and thread it through the bottom of your head up through the top hole or vice versa.  Take the hook of the hanger and thread it through the string from the bottom hole.

image

After you hook the string, pull it through to secure your ghost.  Add a few small pieces of duct tape to the top hole to keep the string from dropping through.  When you’re finished, it will look like this:

image

Your last step is adding the creepy cloth.  Just drape it over the ghost’s shoulders and head, threading the string through a hole in the cloth to secure it.  You can add as much or as little as you want depending on how transparent you want your ghost to be.

Tada!!!  Your ghost is finished!

Processed with Snapseed.

Doesn’t he look cool?  It was so easy that I plan on making a few more.

Processed with Snapseed.

So there you go.  You just made a cool decoration for your yard.  And the beauty of this little project is that you can change it up quite easily.  You can do all sorts of variations to make different kinds of ghosts or other types of monsters.  

  • Paint the head with glow paint.
  • Use white foam cover and cheesecloth to create a classic ghost.
  • Use a foam head with a mask.  
  • Add lights along the shoulders or draped down under the cloth.  
  • Add hands with extra wire and duct tape.
  • Use longer, stronger wire to make a gigantic creature.  

There are so many possibilities.  Not to go self-help on you, but the only thing limiting yourself is you.

I hope you enjoyed this quick and easy tutorial.  If you have any questions, feel free to leave a comment or shoot me a message through the contact page.  Happy Haunting!

Corpsing A Skeleton: An Easy Guide

I just discovered my favorite Halloween DIY project today: corpsing a skeleton.  I’d been hesitant to try it before because I’d only seen tutorials that used sticky adhesive or latex, and I’m cheap enough to not want to “mess up” one of my skeletons.  But after finding a tutorial online that only involved plastic sheeting, a heat gun, and some stain and realizing that I can pick up a new skeleton any time I need, I decided to try it out.

It’s way simpler than I thought it would be, and I love the results.  If you have a skull or skeleton or even just a bone lying around, you should seriously think about giving corpsing a try.

First off, let’s talk supplies.

Processed with Snapseed.

To corpse a skeleton or skeleton part, you need the following:

  • Skeleton/skull/bone
  • Plastic drop cloth
  • Heat gun
  • Spray adhesive (optional)
  • Varnish (assorted colors)
  • Box cutter/scissors
  • Rubber gloves

Speaking of heat guns, just look at this beauty I picked up this weekend, care of a well-timed gift card to Lowe’s from my husband.  He’s a good man.

image

I’m going to go through this step-by-step as if you’re doing a full skeleton, but you can use the technique for whatever part your corpsing.

If you opt to use spray adhesive (and I highly recommend that you do), lightly spray the torso of your skeleton.  Cut a section of drop cloth to the length of the torso, and start wrapping.  You can wrap the full plastic around the torso at one time, or you can wrap in sections.

After you’ve wrapped the torso of your skeleton, it’s time to break out the heat gun.  Focus the heat gun on the plastic, making sure not to stay in one area too long (you don’t want to melt your skeleton).  You should also focus the heat on different sections of your plastic to melt holes strategically around your skeleton.  Corpses don’t rot neatly (I should know), and you don’t want your nasty guy looking too Martha Stewart perfect.  Play around with it.  If you don’t like what you see, add more plastic, and melt it again.

Repeat on each section of the skeleton.  I recommend going in the following order:

  1. Torso
  2. Arms
  3. Legs
  4. Pelvis (overlapping the legs)
  5. Shoulders (overlapping the torso and arms)
  6. Neck
  7. Skull

This is what your skeleton should look like after torso and arms wrapped and shrunk.

Processed with Snapseed.

For the hands and feet, you need to use your box cutter or scissors to cut the plastic around the fingers and toes.  Then, shrink the cut plastic around the smaller bones.

When adding plastic to your skull, it’s much harder to wrap like the other areas, so this is where the spray adhesive really comes in handy.  Take smaller squares of the plastic and spray lightly with the adhesive.  Smash the sprayed plastic on the skull without keeping it straight.  It looks best when it isn’t perfectly flat.  Add heat, and when it looks right to you, you’re finished.

Next is my favorite part of any project: making it pretty!

Using a foam brush, dab whatever color of stain you’re using to the plastic on your skeleton.  You can use any combo of colors you want.  I went with a red and dark brown combo because I wanted my corpse to have that human-jerky look.

After dabbing color on a section, use a paper towel to smear and spread the stain around to hide any brush marks and blend your colors.  When you’re finished and the stain is dry, dry-brush the full skeleton to highlight the sinewy effect of the melted plastic.  I used a moss green here, and I really liked the result.

These are some other color combos you can use:

  • Bloody corpse: red stain with a little black stain added; bright red dry-brushing
  • Toxic corpse: green, gray, and black stains; lime green dry-brushing
  • Buried corpse: light tan and brown stains; black dry-brushing
  • Burnt corpse: dark brown and black stains with red highlights; orange dry-brushing
  • Moldy corpse: green, brown, and tan stains; light green/blue dry-brushing

Play around with it.  There are so many different kinds of paints and stains out there that you can get any look you want.

image

And here’s a close-up of my guy.  The pic really doesn’t do him justice.  He’s much better in person, and I’ve already gotten quite a few compliments.

image

I really hope my newfound corpsing enthusiasm takes some of the trepidation out of corpsing your own props.  I also had a little fun corpsing a Dollar Tree skull, but I’m saving that for another post.  Let me know in the comments if you have any questions or just send me a pic of your project!

And if you’re interested in some other fun things you can make for Halloween, please check out my other tutorials below!

How to Make a Giant Spiderweb

We’re now 6 days into October, so I hope everyone’s Halloween decorating is going well.  I had a full Saturday putting out all of my yard decs, and I feel a little more complete now.  Halloween-time just does that to me.

I’m sure there are some of you out there that feel like you need a little more oomph to your yard, so I thought I’d give a quick tutorial for a simple project that makes a big impact: a DIY giant spiderweb.

Surprised?  You shouldn’t be. That’s the post title.  Keep up.

So for this little project, all you need are a few simple items.

Processed with Snapseed.

As you see in the pic above, you need a good length of clothesline, a few yard stakes, and scissors.  They’re not pictured, but you also need some nails to attach the cobweb to your house.

You basically want to make a six-pointed star with your nails and stakes, with the nails for the top three points and the stakes for the bottom three.  If you’d rather use hooks to attach the web base to your house, that would work, too.

The bottom side point stakes should be positioned a little behind and several feet away from the bottom point stake to ensure you get a good shape to your web.  If you position it too closely, your cobweb could turn out looking a little square.

Optional: If you feel so inclined and your circumstances allow it, you can make an eight-pointed star by using an extra string of clothesline  and a few more nails/stakes.  I think a six-pointed star is sufficient, but you can do this if you want.

After you have your nails and stakes positioned, take an end of the clothesline and tie it to your first nail.  String the clothesline to the stake, tie it off, and repeat it with the side points, crossing over the center string.

To make the rest of the web, start with the center ring.  Tie an end of the clothesline to the center line.  Then, you’ll just wind your rope around each line until you get back to the center line.  See the pic below:

Processed with Snapseed.

Doesn’t look to hard, does it?

And that’s really all you have to do. Rinse and repeat until you get the size of web that you want.  If you want to make sure your strings don’t sag, you can put a drop of glue where you wind the clothesline around itself, but I’ve never had a problem without it.

To make it even better, add a skeleton or body to the center of your web.  My mother-in-law had a few large spiders on hand when I made this web for her last year, so it really made an impact.

Processed with Snapseed.

There you have it.  It’s such an easy project to do, and as you can tell, it gives you a big bang for your buck.  I hope you try it out. Let me know what you think in the comments!

DIY Halloween: Skills You Need

For my last DIY Wednesday post, I gave you a list of materials you needed to gather for your Halloween projects.  Materials, however, are nothing without skills.  What skills? I thought you’d never ask.

DIY Halloween_ Skills You Need(1)

1. Making a budget

image

I know.  It’s not fun to think about (unless you like math – like me), but budget plays a big part in your Halloween DIY process.  Why make a prop if you can buy it cheaper?  My main impetus for prop-making instead of prop-buying is saving money.

Also, I’m a little vain, so compliments about my work are a big factor, too.

When I’m about to start my seasonal prop-making process, I like to sit down and write a list of a) the props I want to make, b) the materials I need to make those props, c) the approximate cost, and d) where I can buy materials for the cheapest amount.  You don’t want to just start buying a bunch of supplies that you may or may not need.  That’s just wasteful.

2. Knowing what will come in handy

image

I’m not recommending for anyone to become a hoarder, but if it’s close to Halloween, keep an eye on your garbage.  Many of the things we call trash can be very useful for a prop.  Milk jugs can be cut up to become fingernails, newspaper can be used for papier mache, paper towel/toilet paper rolls can become prop arms, etc…  The list goes on and on.

For example, we use plastic grocery bags for trash bags in our house.  I felt like we were suddenly getting covered up in them, so I almost threw them out.  I stopped myself, though, because plastic grocery bags are pretty great for filling out prop bodies.  Now, I have a small bunch of them being stored for the Halloween season.

3. Having basic hardware knowledge

image

This might seem a little elementary, but props need tools.  That’s just a fact.  Know when to use a hammer, a power drill, nails vs. screws, etc…  Watch some tutorials online.  For real.  YouTube is a valuable resource for just about anything, and that goes for prop-making, too.

4. Knowing how to use electronics, motors, etc…

image

This is more for advanced prop-makers, but who doesn’t love a moving prop.  Or even an immobile prop that lights up.  There’s just a certain oomph that electronics give to props, so don’t be scared.  Dive in. The YouTube comment from the last section goes for this, too.  There are also schematics online to help with wiring.

It doesn’t have to be that complicated.  You can use oscillating fans for moving heads.  You just have to know how to rig everything up and not blow out the motor (I learned my lesson on that one).  Or you can just start small with lights and batteries from Radio Shack.

Don’t. Be. Scared.

5. Painting

image

Painting can make or break your prop.  It’s the final step (usually), so you don’t want to screw up your prop at the very end.  It’s just as easy to make a prop look terrible with paint as it is to make it look awesome.  You don’t want to get to the end of making a severed head or gravestone out of styrofoam and screw up by using spray paint.  Your prop will be eaten, and you will be sad.

That’s the first step: know what type of paint to use.

The second is knowing how to use paint.  If you have a large prop, it’s best (in many cases) to give it a base coat of one dark color and then dry-brush on your accent color to give your prop depth and character.  If you need to use spray paint, MOVE YOUR ARM CONSTANTLY.  And use light coats.  Some props might benefit from the gloppy, drippy look, but many will not.  Just go one step at a time, and when you’re happy with the look, stop.

6. Sewing

image

I wish I could say I saved the best for last.  I wish I could say I’m an expert sewer.  I wish I could say sewing is fun.

I wish for a lot of things.

But I suck at sewing.  I hate  it.  The fact is, though, that sewing is pretty useful.  And the great thing about making Halloween props is that the sewing doesn’t necessarily have to be perfect.  You can do it by hand or use a sewing machine.  Some props might benefit from a nicely-tailored outfit, but some might benefit just as well from burlap and a chunky twine stitch.  Use whatever you need to make it look good.  No one’s going to be inspecting them too closely, so don’t freak out too much about it.

image

I could go on and on, but these are the main skills I think any good prop-maker needs.  You don’t have to start off as an expert.  Learning is a process, and there’s always a bit of trial and error with this DIY stuff.  Just keep your cool, and don’t get discouraged.  You’ll do fine.

And if not, you can always buy something.

DIY Halloween: Materials You Need

It’s August, and since Halloween is less than 100 days away, it’s time to start your projects.  You might think, “It’s only August.  I have PLENTY of time.”

You’re wrong.

Just check out this picture I took today:

20160802_185110

Yep.  That’s the beginnings of a Halloween store. Halloween Express to be exact.  They’re getting ready for the holiday, and so should you.

If you’re new to the DIY Halloween thang, you might be wondering where to start.  Well, look no further for I have been sent here to enlighten your minds!  Or at least I’m prepared to help get you started.  First things first, we’re talking materials.

DIY Halloween_ Materials You Need(1)

PVC Pipe

I wrote a whole post about this stuff, so you should check it out here.  From monsters to cages to mausoleums, this stuff can be the base for anything.  Adult tinker toys, ladies and gentlemen.  That’s what they are.  Buy some pipe and fittings today at Lowe’s or Home Depot.  And don’t forget your pipe cutter!

Papier Mache

Newspaper and the glue mixture of your choice is all you need to make a crazy awesome prop.  I used some to make a cool scarecrow head one year (read here), and I also made a witch head for a prop last year, which I’ve yet to discuss on the blog.  That’ll come later.

Monster Mud

This stuff is like heavy duty Papier mache used for bigger projects.  To make this stuff, all you need are drywall joint compound (found at any hardware store) and any latex paint you have lying around.  Color doesn’t matter because this stuff is fully paintable after it dries.  Mix it with a drill and paint-stirrer attachment in a large bucket.  After that you can dip fabric in the stuff to cover your props or just paint on the mud itself to create an outer shell.  There are a ton of tutorials online.  Just check out Google or Pinterest for some ideas.

Wire

You can use different gauges of wire to do different things.  I like to use a lighter gauge wire to hang props and heavier gauges to make moldable fingers, spiders, etc…

Foam Heads

These can be found at most craft stores, and they can be used for – well – prop heads.  I made a severed head out of one, which you can read about here.  They can also be used to finish off a full-size prop or even hung with cheesecloth to make a ghost.  Oh, that reminds me…

Cheesecloth

Cheesecloth is pretty versatile.  You can use it to make ghosts and shrouds, you can drape it over mantels or tables for a creepy effect, or you can pair it with monster mud to create detail or make clothing for your props.

Old Clothes

What?  You want your props to be naked?  Well, that’s your decision to make, but for those of us who want props suitable for the eyes of tiny trick-or-treaters, clothing is kinda essential.  Go to garage sales or just raid your closet for old items you don’t want anymore.  The fun part is aging them.  Bury your prop clothes, rip them, paint them, run them over with your car – anything to make them look nice and old.

Paint

This one is a no-brainer.  You want to make some props, you gotta paint them or it’s just going to look unfinished.  I use spray paint for larger projects and latex/craft paint for smaller crafts and detail work.

Scrap Wood

I think everyone who has a house probably has a few pieces lying around.  I haven’t really used wood to create a large prop, but I’ve nailed pieces together to make a sturdier base for some.

Foam

I don’t have much experience using foam in my crafts, but I’m going to remedy that this year.  You can buy large sheets of foam at home improvement stores, and I’ll be buying some soon to create a life-size coffin.  Foam can also be used to make tombstones.  I’ve got a foam cooler that I plan on fashioning into one in a few weeks.  It’ll be my first foam-based project, so I hope it turns out okay.

image

Well, that list should give you a good start to your DIY Halloween projects.  So gather your materials, folks, and get to crafting.  You don’t have much time.

How to Make an Easy DIY Window Monster

Halloween is creeping toward us, and I am FUH-REAKING out because I haven’t started on my projects yet.  Yes, I have 102 days left as of the date of this post, but I have A LOT planned this year.

I’ll be posting more-involved DIY projects throughout the Halloween season, but since we have a little over 100 days until the big day, I thought I’d just post a quick little project I whipped up a few Halloweens back.

Three Septembers ago (a Friday the 13th actually), we moved from an apartment into a small house.  Moving is a lot of work, so I didn’t have a lot of time to prepare for Halloween that year.  I set out my cemetery and hung up some ghosts and goblins.  I really wanted to do more, but I just didn’t have a lot of time (or money – buying a house is expensive).  I was proud of my little cemetery, but I thought my house was missing something.

We have a big double window by our front door, so I decided to dress it up a bit.  BUT…I didn’t want to spend any money.  Luckily for me, I’ve got a creative mind.  I had some black, easy-peel contact paper – the kind that doesn’t stick too much.  I cut out some eyes and teeth, stuck them to the window, and – VOILA! – window monster.

image

Ain’t it fun?  It took hardly any time at all, but it added a bunch of Halloween flava.  Kids loved it, and with it backlit from behind with a low lamp, it showed up great.

What kinds of fun projects do you foresee for your Halloween festivities?  You better start planning now!  I know I am.

DIY Dollhouse of Horrors: Part 3

Another DIY Wednesday calls for yet another installment of…

The Dollhouse of Horrors!

If you haven’t read parts 1 or 2, click on the links.

Outfitting a haunted dollhouse with creepy items is no small task (Yes, that was a pun. Deal with it).   There just aren’t that many creepy minis for sale out there.  Well, at least not any that don’t cost a buttload.  A ‘buttload’ in this case means ‘more than I’m willing to pay for something I can make myself.’

Anyway, I enjoy playing with clay and getting my hands dirty, so I decided to craft some myself.  I started with some easy headstones, pumpkins, body parts, and a land/sea monster:

image

image

And then I decided to look to the movies and other scary things for inspiration.  I thought it would be cool to just have little nods to the classics out there and some of my favorites.

image

image

I made Jack Skellington’s head, a clay hook that reminded me of Candyman, some red ball candy to honor One Missed Call, the Necronomicon, an ear of corn for the fridge from Children of the Corn, and other little things.  I also spruced up a few items I already had.  An axe got a little bloodier, a pie got a little blood-action, too (Sweeney Todd, anyone?), and an errant Polly Pocket got painted to look like Chucky.

And just for the record, here’s a picture of my dirty hands:

image

So much fun.

Next DIY Wednesday’s post will feature the inner decor of the house.  Check back to see the progress!

DIY Dollhouse of Horrors: Part 2

Well, it’s another DIY Wednesday, and I’m sure you were waiting on pins and needles for the next installment of…

THE DOLLHOUSE OF HORRORS!!!

I wrote about why I decided to make a haunted dollhouse and the planning stage in the previous DIY Wednesday blog post, so if you haven’t read that yet, go here.  

After the planning stage, the only thing left to do was buy the actual dollhouse kit.  I waited for a 40% off Hobby Lobby coupon (believe it or not, they didn’t always come every week back in 2009) and off I went to my favorite craft store where I bought this:

image

I won’t lie.  I was really excited to get this thing, but when I opened the box and saw all the little parts, I was a bit overwhelmed.  If you decide to build your own dollhouse, don’t fret.  Just follow the instructions, and you’ll be fine.

Even though I got a case of the ‘Uh Ohs’ after I saw the contents, I still couldn’t wait to get started.  I like to be completely prepared before I start a project, so I made sure I had all the necessary materials for construction before I jumped in, including:

  • Wood glue,
  • Painter’s tape,
  • A craft knife,
  • Sand paper,
  • A ruler,
  • Measuring tape, and
  • A pencil.

Then, the fun began.

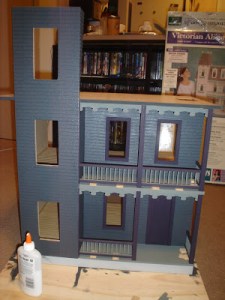
image

Sadly, I don’t have many pictures of the actual construction process, but you can see from the pic above that there was a lot of gluing and drying time involved.  It wasn’t too hard to do after I got started; it just took a lot of time and patience.   It was just like a big puzzle. So. Much. Fun.

image

image

There were also a lot of little parts that were easier to paint before I glued them to the house.  I went with a dark purple and gray color scheme because I wanted it to be really dark, but I didn’t want it to be black.  Plus, purple is one of the primary Halloween colors.  It just felt right, you know?

Here’s a pic of the painted house waiting for a roof:

image

And here’s a pic during roof construction:

image

And then another of the house with the roof completely on:

image

And…drumroll please…here’s the finished house!

image

Well, almost finished.  And you can see the plywood “yard” I put the house on.  I ended up gluing the base of the house to the wood so it would be a little sturdier.

I enjoyed building the house, but my favorite part was decorating it!  That part is still in progress, so be sure to check back on the next DIY Wednesday for another installment of…

THE DOLLHOUSE OF HORRORS!!!