Tag Archives: Scary

DIY Dollhouse of Horrors: Part 2

Well, it’s another DIY Wednesday, and I’m sure you were waiting on pins and needles for the next installment of…

THE DOLLHOUSE OF HORRORS!!!

I wrote about why I decided to make a haunted dollhouse and the planning stage in the previous DIY Wednesday blog post, so if you haven’t read that yet, go here.  

After the planning stage, the only thing left to do was buy the actual dollhouse kit.  I waited for a 40% off Hobby Lobby coupon (believe it or not, they didn’t always come every week back in 2009) and off I went to my favorite craft store where I bought this:

image

I won’t lie.  I was really excited to get this thing, but when I opened the box and saw all the little parts, I was a bit overwhelmed.  If you decide to build your own dollhouse, don’t fret.  Just follow the instructions, and you’ll be fine.

Even though I got a case of the ‘Uh Ohs’ after I saw the contents, I still couldn’t wait to get started.  I like to be completely prepared before I start a project, so I made sure I had all the necessary materials for construction before I jumped in, including:

  • Wood glue,
  • Painter’s tape,
  • A craft knife,
  • Sand paper,
  • A ruler,
  • Measuring tape, and
  • A pencil.

Then, the fun began.

image

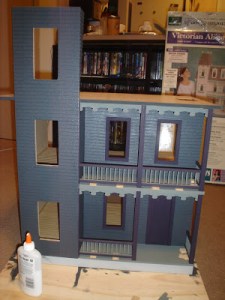
Sadly, I don’t have many pictures of the actual construction process, but you can see from the pic above that there was a lot of gluing and drying time involved.  It wasn’t too hard to do after I got started; it just took a lot of time and patience.   It was just like a big puzzle. So. Much. Fun.

image

image

There were also a lot of little parts that were easier to paint before I glued them to the house.  I went with a dark purple and gray color scheme because I wanted it to be really dark, but I didn’t want it to be black.  Plus, purple is one of the primary Halloween colors.  It just felt right, you know?

Here’s a pic of the painted house waiting for a roof:

image

And here’s a pic during roof construction:

image

And then another of the house with the roof completely on:

image

And…drumroll please…here’s the finished house!

image

Well, almost finished.  And you can see the plywood “yard” I put the house on.  I ended up gluing the base of the house to the wood so it would be a little sturdier.

I enjoyed building the house, but my favorite part was decorating it!  That part is still in progress, so be sure to check back on the next DIY Wednesday for another installment of…

THE DOLLHOUSE OF HORRORS!!!

IT’s Coming

Well, if you’re up on your horror news, you know that Warner Brothers recently announced the release date of the remake of one of my favorite movies, Stephen King’s IT.

Cue happy dance.

My mom has said time and time again that she can’t believe she let me watch that movie when it premiered on TV in November 1990.  I was just 6 years old, and I remember watching it with her in my parents’ bedroom, hiding my eyes at some points and loving every minute of it.

Back in those days, we taped everything.  We recorded a VHS copy of the movie, and I wore that thing out.  I can’t even estimate how many times I watched it, but you know how little kids are with their favorites.  It was on constantly.

Seriously. I’m pretty sure it rivaled my little sister’s obsession with Space Jam and Spice World.

I took it with me to every slumber party and sleepover.  It wasn’t my intention to make all my friends scared of clowns, but it happened. I’m not proud of it.

Okay. Maybe a little. 😉

We’d turn it on late at night and watch Pennywise terrorize kids our age.  It was so fun.  We loved the scene where Georgie’s picture winks at Bill with its awesomely 80s horror movie track and the one with Pennywise coming out of the drain.  I don’t know if I ever took a bath or shower without thinking of that one.

Another favorite was the scene in the Chinese restaurant. Fortune cookie, anyone?

20160424_210451_LLS

Tim Curry’s Pennywise will forever hold a special place in my heart as one of my favorite villains.  I don’t know anyone that would argue that Curry didn’t play that role to perfection.  That voice. That laugh. I don’t know how anyone can fill those shoes.

Let’s see if the September 2017 date sticks.  I’m not holding out hope since the production has seen so many problems, but you can bet I’ll be first in line if it does.

Throwback: Chilling Children’s Stories

Slumber parties. Sleepovers. Campouts. When a group of children gather, it’s just a matter of time before scary stories are told.

Some of my best memories are of ghost stories told in whispers at sleepovers after all the adults had gone to bed.   So for this Throwback Thursday post, let’s talk about the books and stories that fueled the fire.

In a Dark, Dark Room and Other Scary Stories

1461122295892

This book was my first introduction to reading horror stories.  My mom would take my sister and me to the public library for their summer reading program, and we always wanted to check out this book.

Like most children’s books, the stories are short and simple.  But although it’s written for kids, the content is chilling even today.  It’s full of tales taken from folklore of various cultures.  The illustrations set the tone of the book with a little bit of humor and just the right amount of creepiness.

The story that stands out most to me is the one about the girl who wore a ribbon around her neck. Spoiler alert: her husband removes it on her deathbed, and her head falls off. As a kid, I loved that one.

The Scariest Stories You’ve Ever Heard

1461122128741

I snagged these at book fairs in elementary school and brought them with me to every sleepover.  My love of urban legends came from these books, which were directed at a younger audience but were still full of dark and scary content.

The call is coming from inside the house!” Yep. The first time I ever heard or read these words was from the first book in this series.  I remember the first time I read about the hook hand and the one about the boyfriend who is hung over his car while his girlfriend waits inside, listening to the scratch, scratch, scratch of his feet above.

Good times.

Scary Stories to Tell in the Dark

1461122419009

Oooooohhhhh, man.  Lets talk about the big daddy of them all.  If you’re in your mid-20s to mid-30s and had even a slight interest in scary stories as a kid, you KNOW these books.  They’re still favorites of mine today.  Quirky, creepy, gross, and sometimes funny – how could you not love this stuff?

And let’s talk about the thing that elevated this from just another scary book to an unforgettable experience – Stephen Gammell’s horrifying illustrations.  Even if you can’t remember a specific story, I know you can remember the pictures. The one with the rotting ghost woman is the lock screen on my phone.  If my husband wouldn’t object, I’d display his art in my house.  Just sayin’. I LOVE IT.   The books are still around today, but the drawings have been replaced by those that are considered “kid friendly” instead.  I feel sorry for children today that won’t have the opportunity to get freaked out by these things.

So what about you? Are there any creepy books from your childhood that you miss?

How to Make a SEvered Head: An Easy-to-Follow Guide

I love severed heads.  Not real ones, of course.  I love the fake kind, and I experience quite the thrill when I finally get to check out the selection at Spirit Halloween and Halloween Express each year.  I usually buy one myself, and then my mother-in-law gets me one for Christmas.  It’s a tradition that I’m pretty fond of and one that makes my MIL one of the best in history.  Does your mother-in-law get you  severed heads for Christmas?  I didn’t think so.

Anyway, I love getting a “commercial” creepy head, but there’s a certain charm in the homemade stuff.  A few years ago, we moved from an apartment to our house, and with the added space came a new-found love of making props.  So even though I already had a pretty decent head collection at that time, I thought I’d try my hand at making one myself.

This is how I made my very first DIY severed head Halloween prop.

Materials

  • Foam Head (any size you prefer)
  • Craft Knife and/or Metal Carving Tools
  • Prop Teeth
  • Hot Glue Sticks & Glue Gun
  • Assorted Paints (blood-colored + any other colors you need to create your vision)
  • Plastic Eyes (optional)
  • Twine/Thick String (optional for hanging heads)
  • Ice Pick/Long Screw Driver/Thick-Gauge Wire (optional for hanging heads)

Step 1

I started by purchasing a foam head from Hobby Lobby that using one of their 40% off coupons.  (Aside from being a horror fan, I’m also a big proponent of getting the best deal, so I try to buy as many of my supplies on sale or clearance as possible.)

 Hobby Lobby has a few varieties of heads to choose from – female, male, and faceless – so you can choose whichever fits your project best.  Although the faceless ones are creepy on their own, I wanted mine to be pretty big, so I went with a male head.

20140905_181053

Step 2

As you can see from the pic above, my next step was to draw out the features I wanted for my severed head.  I wanted it to be gross, and keeping both eyes just wasn’t an option.

Step 3

I used a craft knife and some metal sculpting tools to pick and carve out where I drew my guidelines: one of the eyes, part of the scalp, and the base of the head to make it look actually severed.  I recommend roughing up the base of the head for any head you create. We want realism wherever possible, people, and a clean-cut head just won’t – well – cut it. (I’m sorry. I hate myself).

Step 4

To give him a more realistic-looking mouth, I also carved out some of the area around the side of the mouth and jaw and used some fake zombie teeth that I bought at Spirit Halloween.  The teeth were rubber and very easy to cut.  They were also ridged on the back to make them easy to wear, so I sliced off the back to make them lay flat as possible to fit the head.  I then used a hot glue gun to secure them in place.  You can see in the pic below that my guy was already looking pretty handsome at this stage.

20141030_222610

Optional Step (not pictured)

If you want to add eyes to your severed head instead of painting them on, there are many options for plastic fake eyes to find in your local Halloween stores. I recommend finding the hollow plastic versions that are easier to cut for this project.

Cut the eye in half with a craft knife and hold to your foam head in the position you want it. Trace the outline of the eye, and use your craft knife to cut straight into your foam in the approximate depth of your eye. Test the depth of your cuts with the eye before adhering to the head. When you’re satisfied, add glue to the inside of the eye, an then stick the eye edges down into your cut foam.

Tip: You could also use yarn, twine, wire, or something similar to stick to your head and eye if you want to go for that “just-popped-out-eye” look.

Step 5

After the glue dried, it was time to make it PRETTY!!!  Pretty to me, at least.  I already had a lot of paint on hand so I mixed some random colors together to get a sickly, partially-decomposed skin color.  Like I said – pretty.  I also mixed some red, black, and brown to get a realistic bloody color.  I slapped my paint mixtures on until I got the look I wanted and – VOILA! – severed head!

You have a lot of options at this stage. It really depends on the look you’re going for. Be creative!

20141030_235533

Isn’t he beautiful?

My zombie head has served me quite well these past few Halloweens.  Another benefit from these foam heads is that they already have a hole in the base, perfect for sticking them on pvc pipe or dowel rods to make a full-body prop, a head-on-a-stake, or something else equally cool.  I turned my severed head into full-body prop the first year.  (See the tutorial here.) You can see by the sweet flannel shirt in the pic above that he was quite stylish.

If you want a great creepy project, I recommend you try making yourself a severed head of your own.  It’s a cheap and easy way to up the scare factor in your home for Halloween. Plus you get the sense of accomplishment you feel when you make something with your own hands.

If Halloween isn’t your thing, it could be especially therapeutic if you make one to look like an enemy.  No judgment.  We’ve all been there.

You do you, man.